
Certificates are easily deployed in an Active Directory (AD) infrastructure, but using them to manage access — especially to websites hosted on an Internet Information Services (IIS) server — can be challenging due to the lack of good documentation on the Internet. And so, I have created this tutorial that will teach you how to configure this feature on an IIS server. You can also use this as a quick and convenient “cheat sheet” for reference.
Why Should You Use this Feature?
This feature adds a layer of authentication to ensure the legitimacy of a client before they can reach a highly sensitive website. It can be configured in front of your websites, or as a subset of your websites. Only users that provide the right certificate will be granted access.
Is It Really Secure?
This form of authentication algorithm is enforced mathematically with asymmetric cryptography. TLS (formerly known as SSL) client authentication has been part of the Transport Layer Protocol for a long time, and it is an industry proven standard for secure communications.
This feature is also often used for compliance in large organizations that need to ensure that only authorized users can access internal websites.
Since this feature is part of the TLSstandard, most servers, such as IIS, Apache, and Nginx, support it natively. Popular browsers (e.g. Internet Explorer, Chrome, Firefox, etc.) also support it natively.
Requirements
Here is what you need for this tutorial:
- Certificate Authority Certificate
- Server Certificate
- Client Certificate(s) (For users)
Before You Begin
If you need to generate the certificates, please view my previous blog post. After that is done, complete the following:
1. Install the ca.crt (public key) file in the following IIS server certificate store:Local Computer -> Trusted Root Certification Authorities
2. Merge the server.crt (public key) and server.key (private key) files into a single file named server.pfx with the following command line:
openssl pkcs12 -export -out server.pfx -inkey server.key -in server.crt You will be prompted to enter a password; make sure you use a strong one.
Install the resulting server.pfxfile in the following IIS server certificate store:
Local Computer -> Personal
3. Each client that will access the server needs a certificate. Just like the server certificate above, both the public key (.crt) and private key (.key) will need to be merged into a single <client name>.pfx file. The <client name>.pfx file will need to be installed on the user’s computer in the following store:
Current User -> Personal
I have tried to simplify this tutorial into easy-to-follow steps. I’ll detail how to do it manually and also via PowerShell script. However, the scripts might need to be modified to match your environment.
How to Configure IIS
Step 1 - Enabling the Required Features
Enable IIS Client Certificate Mapping Authentication in the Windows’ features dialog, which is in the Internet Information Services -> World Wide Web Services -> Security section (see image 1).
The Windows’ features dialog can be opened using the following shortcut:
WIN + R -> optionalfeaturesOn a Windows Server, you can enable this feature in the server configuration manager. It can also be enabled using the following PowerShell command:
Enable-WindowsOptionalFeature -Online -FeatureName IIS-IISCertificateMappingAuthenticationEnable-WindowsOptionalFeature -Online -FeatureName IIS-IISCertificateMappingAuthenticationImage 1 - Enabling IIS Client Certificate Mapping Authentication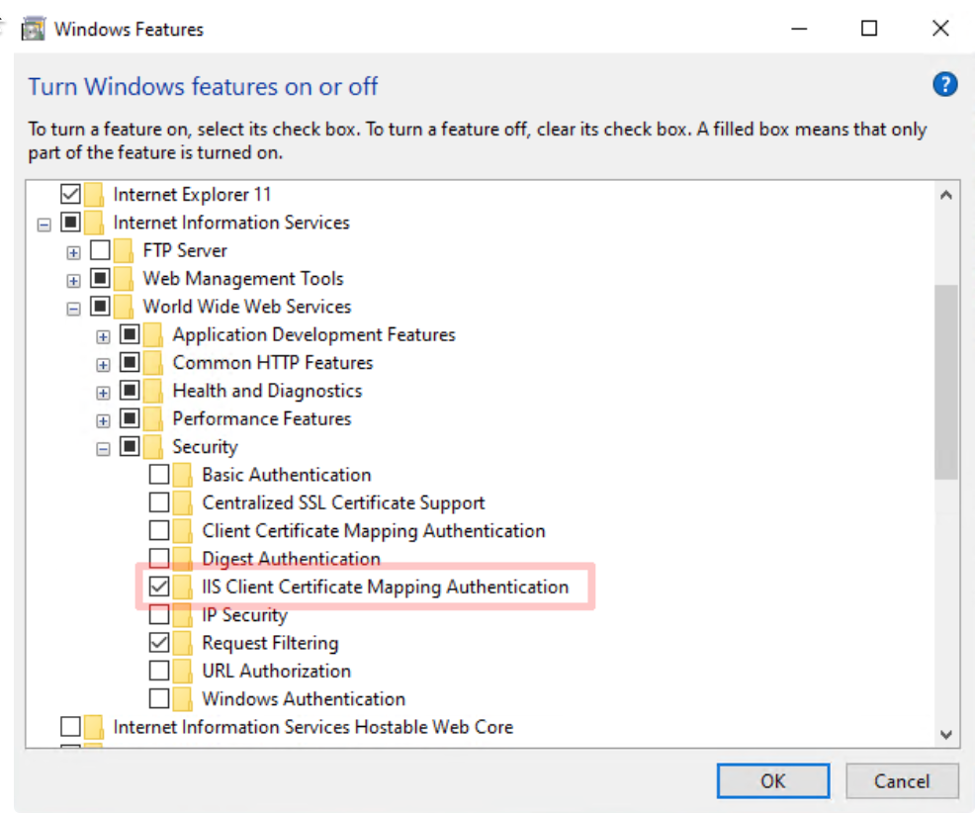
Step 2 - Configure an HTTPS Binding
Configure your SSL certificate in the Site binding dialog in the IIS Manager. To open the Side Binding dialog, select the website where you want to enable this feature, and then click on Bindings. Lastly, add an HTTPS binding and select your server certificate. An example is shown below (image 2 and 3):
Default Web Site -> Bindings… -> Add…
It can also be done with a few simple PowerShell commands:
# List certificates in the local machine personal store.
Get-ChildItem -Path CERT:LocalMachine/My

Thumbprint Subject
---------- -------
838E34D06C2FB5C80E99E6B6938C4127134B32A5 CN=localhost
6A11EAFFBB6A7E1F3CE11DAE82956D4F2973320E CN=mathmo.org, O="MathMoOrganisation, Inc.", S=CA, C=US

# Create HTTPS binding if it doesn't exists
New-WebBinding -name "Default Web Site" -Protocol https -Port 443

# Get the bindings
$bindings = Get-WebBinding -Name "Default Web Site"

# Configure the certificate mathmo.org for the bindings
$bindings.AddSslCertificate("6A11EAFFBB6A7E1F3CE11DAE82956D4F2973320E",'My')
Image 2 – Opening the Site Binding Dialog
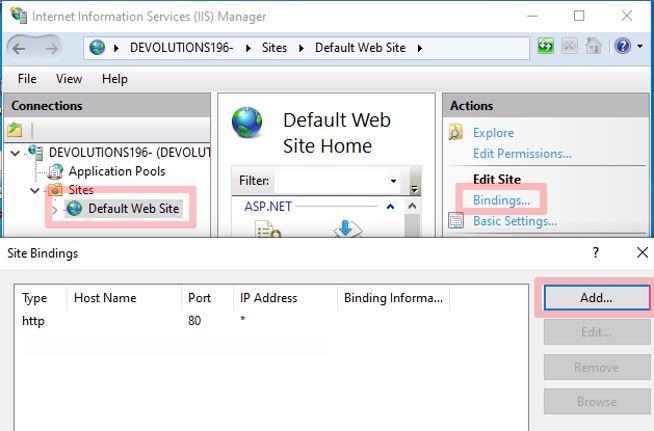
Image 3 - Configuring the Server Certificate for the HTTPS Binding

Step 3 - Enforce SSL on the Website
Ensure that your website requires SSL, and also that it requires a client certificate. This can be done by opening the SSL settings. To do this, select the website where you want to enable this feature, filter for the SSL settings, select it, and click on Open Feature. In the examples show below (see images 4 and 5), the workflow is as follows:
Default Web Site -> Filter SSL Settings -> Select SSL Settings -> Open Feature
This can also be done with a PowerShell command:
Set-WebConfiguration -Location "Default Web Site" -Filter "system.webserver/security/access" -Value "Ssl,SslNegotiateCert, SslRequireCert"Image 4 - Opening the Website SSL Settings

Image 5 - SSL Settings

Step 4 - Disable Anonymous Authentication
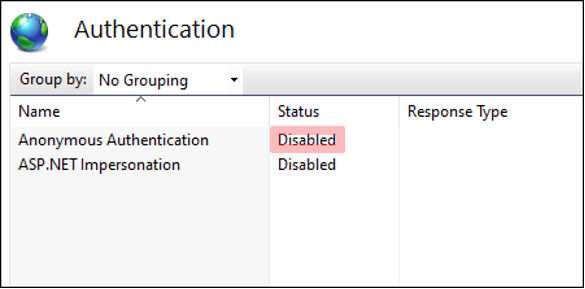
Ensure that you disable Anonymous Authentication on your website by going into the authentication settings (see images 6 and 7).
Default Web Site -> Authentication -> Open Feature
PowerShell command:
Set-WebConfigurationProperty -filter"/system.WebServer/security/authentication/AnonymousAuthentication" -name enabled -value false -location "Default Web Site"Image 6 - Opening the Authentication Settings
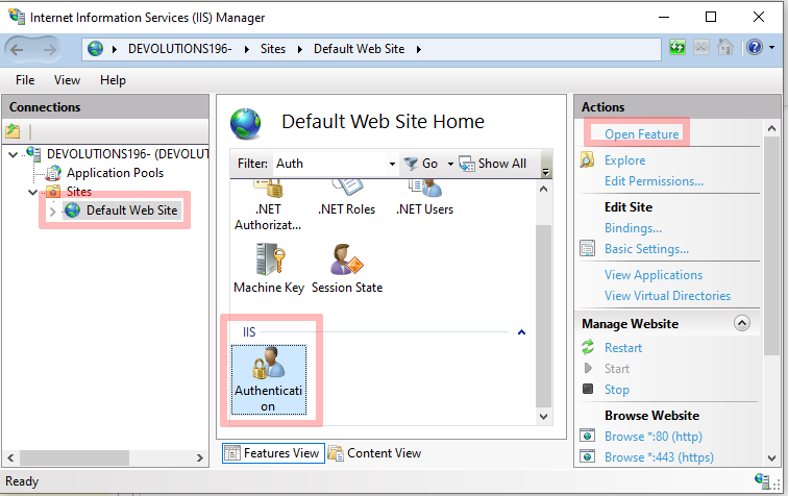
Image 7 - Disabling Anonymous Authentication
Step 5 - Enable Client Authentication in IIS
You are now ready to enable the feature on your website!
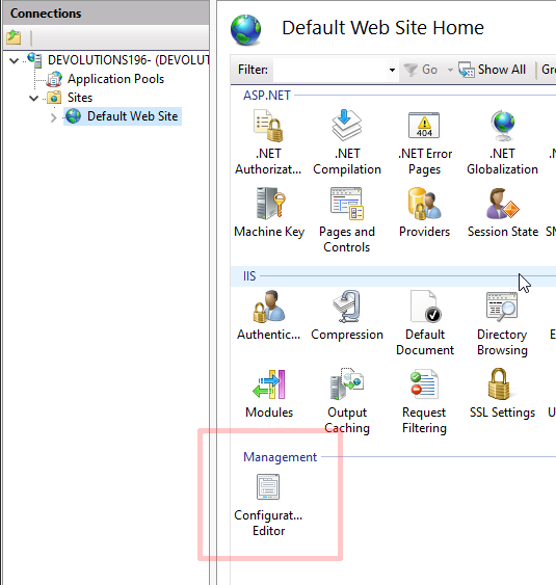
5.1 - Start by opening your website Configuration Editor.
Image 8 - Configuration Editor
5.2 - Go to the system.webServer/security/authentication/iisClientCertificateMapping Authentication section (see image 9).
Image 9 - Section Field
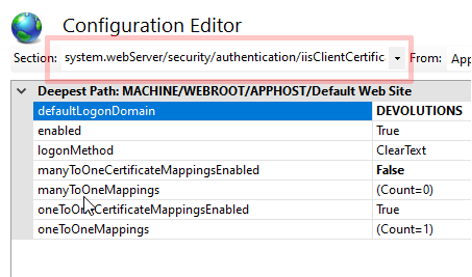
5.3 - Here you can choose to enable manyToOneCertificateMappingsEnabled or oneToOneCertificateMappingsEnabled (see image 10).
PowerShell
# enable certificate mapping authentication for Default Web Site
Set-WebConfigurationProperty -filter "/system.webServer/security/authentication/iisClientCertificateMappingAuthentication" -name enabled -Value true -location "Default Web Site"

# enable oneToOneCertificateMappings for Default Web Site
Set-WebConfigurationProperty -filter "/system.webServer/security/authentication/iisClientCertificateMappingAuthentication" -name oneToOneCertificateMappingsEnabled -Value true -location "Default Web Site"
Image 10 - Enabling the Authentication Feature and the oneToOneMappings Sub-Feature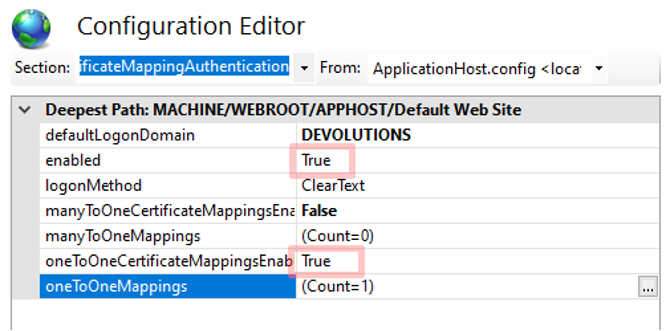
We recommend the oneToOneCertificateMappings, as it requires users to have their own certificate and it is safer. However, manyToOneMappings can also be used. It will reduce the amount of management required, but it is a compromise on the security side of things. Having a single client certificate for a team or a group of users will increase the risk of it being leaked or compromised. The client certificate private key normally must stay on the endpoint where it has been generated.
5.4 - Open the oneToOneMappings Configuration
5.5 - In the dialog you can configure each user with their base64 encoded certificate public key** (instructions on how to obtain it are provided at the end of this article) and their active directory (AD) credentials (see images 11 and 12).
Image 11 - Button to open the oneToOneMappings configuration

Image 12 - Configuring a User

# get the oneToOneMappings collection
$collection = Get-IISConfigSection -SectionPath "system.webServer/security/authentication/iisClientCertificateMappingAuthentication" -Location "Default Web Site" | Get-IISConfigCollection -CollectionName "oneToOneMappings"

$username = Read-Host "Username?"
$password = Read-Host "Password?"
$b64CertificatePublicKey = Read-Host "Base64 Certificate Public key?"

# create mapping in the oneToOneCertificateMappings
New-IISConfigCollectionElement -ConfigCollection $collection -ConfigAttribute @{"enabled" = "True"; "userName" = $username; "password" = $password; "certificate" = $b64CertificatePublicKey}
Make sure that the user has read access to the site folder!
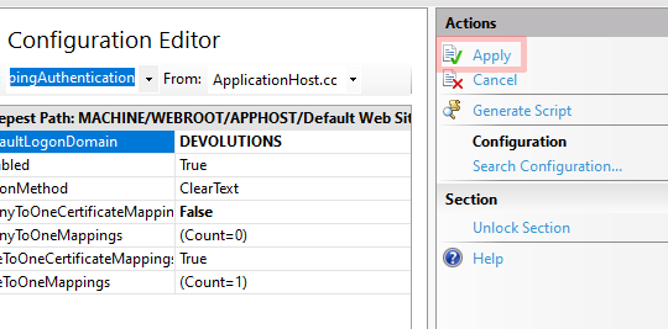
5.6 - Close the Collection Editor and Apply the New Configuration Editor Settings (see image 13).
Image 13 - Applying the Changes
Results
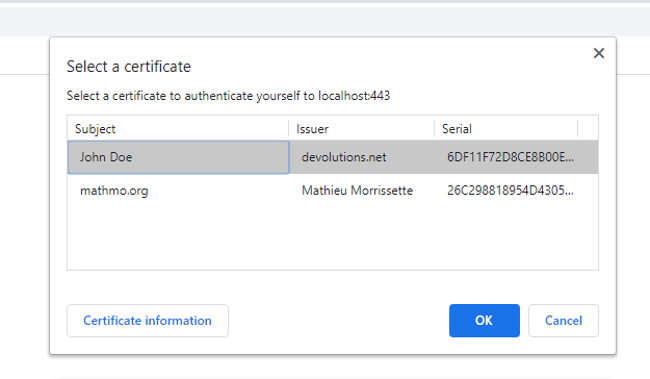
If everything works the way it is supposed to, then accessing the website using a popular browser should prompt a dialog box that forces the user to select a certificate to authenticate themselves before accessing the server (see image 14).
Image 14 - TLS Client Authentication Dialog in Google Chrome
Click here for additional resources.
Note: If you followed this blog to generate self-signed certificates, then the client public key is located in the client1.crt file. The header -----BEGIN CERTIFICATE----- and footer -----END CERTIFICATE----- and line breaks must be removed. View the example below:
File: client1.crt
-----BEGIN CERTIFICATE-----
MIICUjCCAfegAwIBAgIUbfEfctjOiwDqqBR1vupzjdN4qI0wCgYIKoZIzj0EAwIwgZ8xCzAJBgNVBAYTAkNBMQswCQYDVQQIDAJRQzESMBAGA1UEBwwJTGF2YWx0cmllMRkwFwYDVQQKDBBEZXZvbHV0aW9ucyBpbmMuMREwDwYDVQQLDAhTZWN1cml0eTEYMBYGA1UEAwwPZGV2b2x1dGlvbnMubmV0MScwJQYJKoZIhvcNAQkBFhhzZWN1cml0eUBkZXZvbHV0aW9ucy5uZXQwHhcNMjAwNjI1MTUwMjMyWhcNMjMwMzIyMTUwMjMyWjCBlzELMAkGA1UEBhMCQ0ExCzAJBgNVBAgMAlFDMRIwEAYDVQQHDAlMYXZhbHRyaWUxGTAXBgNVBAoMEERldm9sdXRpb25zIGluYy4xETAPBgNVBAsMCFNlY3VyaXR5MREwDwYDVQQDDAhKb2huIERvZTEmMCQGCSqGSIb3DQEJARYXSm9obkRvZUBkZXZvbHV0aW9ucy5uZXQwWTATBgcqhkjOPQIBBggqhkjOPQMBBwNCAAT/kLSLRnKIdewU9Ze8KuZbuz7y1PfhTMEfV7ZQ3gRfSxGdRBxftaNFPtxjkmO9hVowyptUR8UvGc9Ia8rRX6NwoxcwFTATBgNVHSUEDDAKBggrBgEFBQcDAjAKBggqhkjOPQQDAgNJADBGAiEAwvtbZNwzaf1RMvanSGorJwxYSSBiPIUg0YmyfIpG6pwCIQCoE9+V3/2ULCj9NtzEYsW2uPojMQ3ddr1CpE2m07yIdQ==
-----END CERTIFICATE-----
Should be changed to:
MIICUjCCAfegAwIBAgIUbfEfctjOiwDqqBR1vupzjdN4qI0wCgYIKoZIzj0EAwIwgZ8xCzAJBgNVBAYTAkNBMQswCQYDVQQIDAJRQzESMBAGA1UEBwwJTGF2YWx0cmllMRkwFwYDVQQKDBBEZXZvbHV0aW9ucyBpbmMuMREwDwYDVQQLDAhTZWN1cml0eTEYMBYGA1UEAwwPZGV2b2x1dGlvbnMubmV0MScwJQYJKoZIhvcNAQkBFhhzZWN1cml0eUBkZXZvbHV0aW9ucy5uZXQwHhcNMjAwNjI1MTUwMjMyWhcNMjMwMzIyMTUwMjMyWjCBlzELMAkGA1UEBhMCQ0ExCzAJBgNVBAgMAlFDMRIwEAYDVQQHDAlMYXZhbHRyaWUxGTAXBgNVBAoMEERldm9sdXRpb25zIGluYy4xETAPBgNVBAsMCFNlY3VyaXR5MREwDwYDVQQDDAhKb2huIERvZTEmMCQGCSqGSIb3DQEJARYXSm9obkRvZUBkZXZvbHV0aW9ucy5uZXQwWTATBgcqhkjOPQIBBggqhkjOPQMBBwNCAAT/kLSLRnKIdewU9Ze8KuZbuz7y1PfhTMEfV7ZQ3gRfSxGdRBxftaNFPtxjkmO9hVowyptUR8UvGc9Ia8rRX6NwoxcwFTATBgNVHSUEDDAKBggrBgEFBQcDAjAKBggqhkjOPQQDAgNJADBGAiEAwvtbZNwzaf1RMvanSGorJwxYSSBiPIUg0YmyfIpG6pwCIQCoE9+V3/2ULCj9NtzEYsW2uPojMQ3ddr1CpE2m07yIdQ==I hope this tutorial is helpful for you. Please let me know if you would like me to create a tutorial to enable this feature on Apache, Nginx, or other servers!